ljn
Tutorials
Solve ClickHouse JOIN limitations with GlassFlow.
Written by
Armend Avdijaj
-

1. Introduction
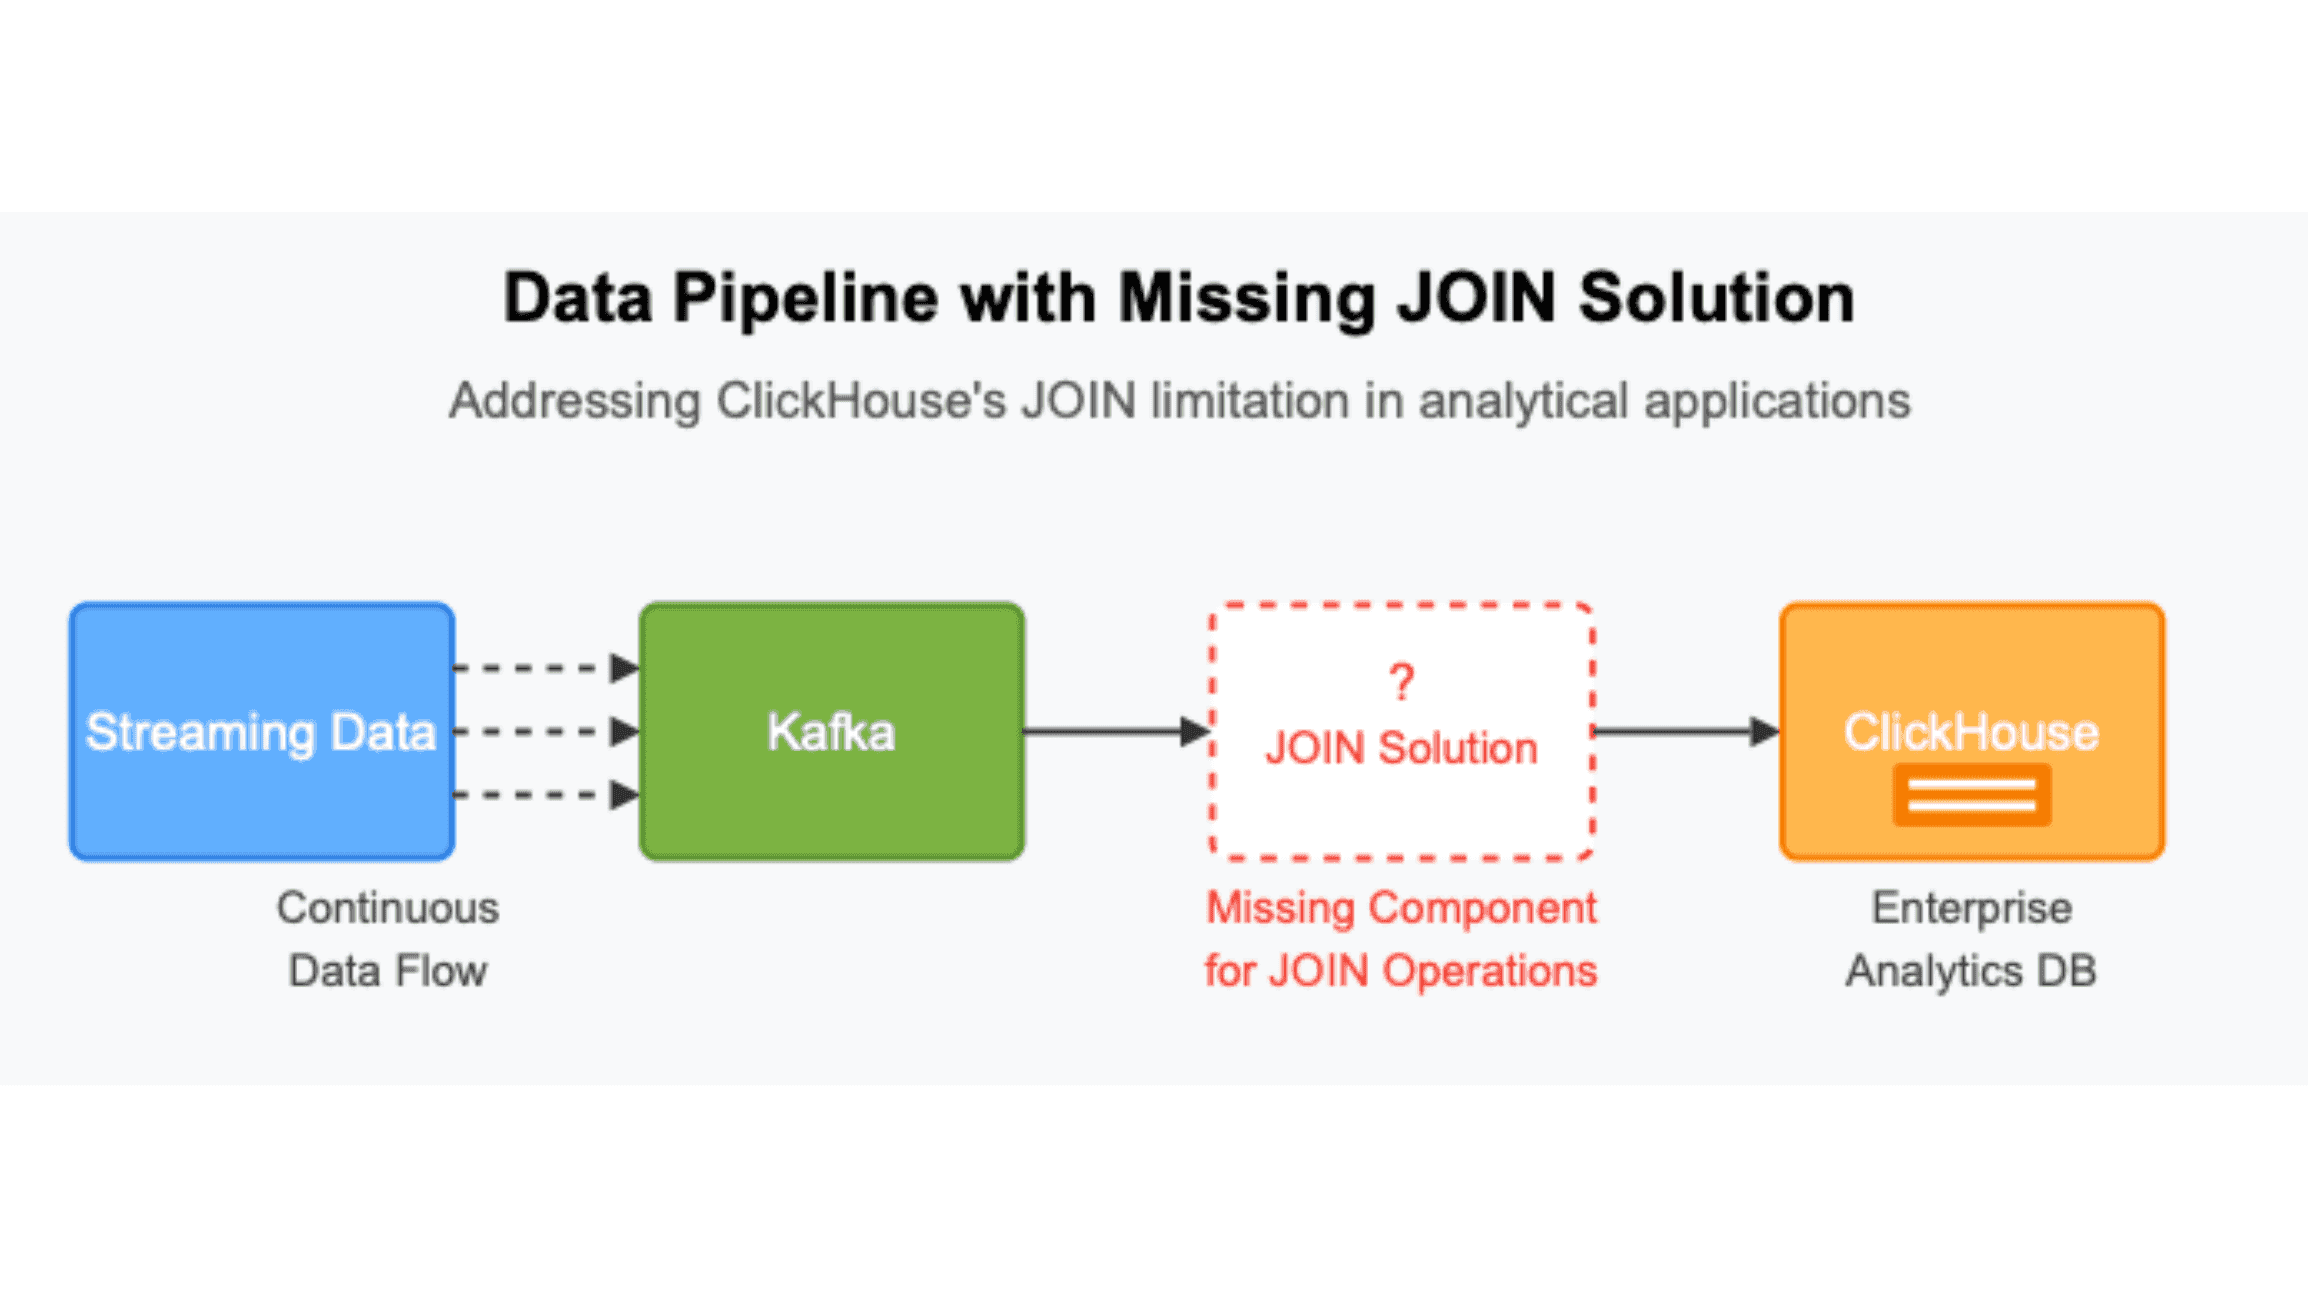
Figure 1. The missing piece of our end-to-end streaming JOIN pipeline
In the previous article we saw how challenging it is to deal with JOINs on streaming data when using ClickHouse. Just for a refresher, here are the two alternatives that were discussed:
Apache Kafka: While ClickHouse can ingest Kafka streams via ClickPipes, it offers no built‑in support for stateful transformations like stream joins.
Apache Flink: A powerful, scalable option—but complex to configure and maintain, with heavy operational overhead.
At the end, we presented a compelling alternative that solves all our challenges: Glassflow. However, no details were discussed in that article. So, the question remains: how does Glassflow solve the JOIN challenges highlighted in the previous article?
Glassflow allows you to define temporal joins through a visual interface - so no complex codes that were needed for Flink! It handles the full lifecycle of stream processing: connector reliability, state management, memory usage, and ClickHouse ingestion all managed under the hood.
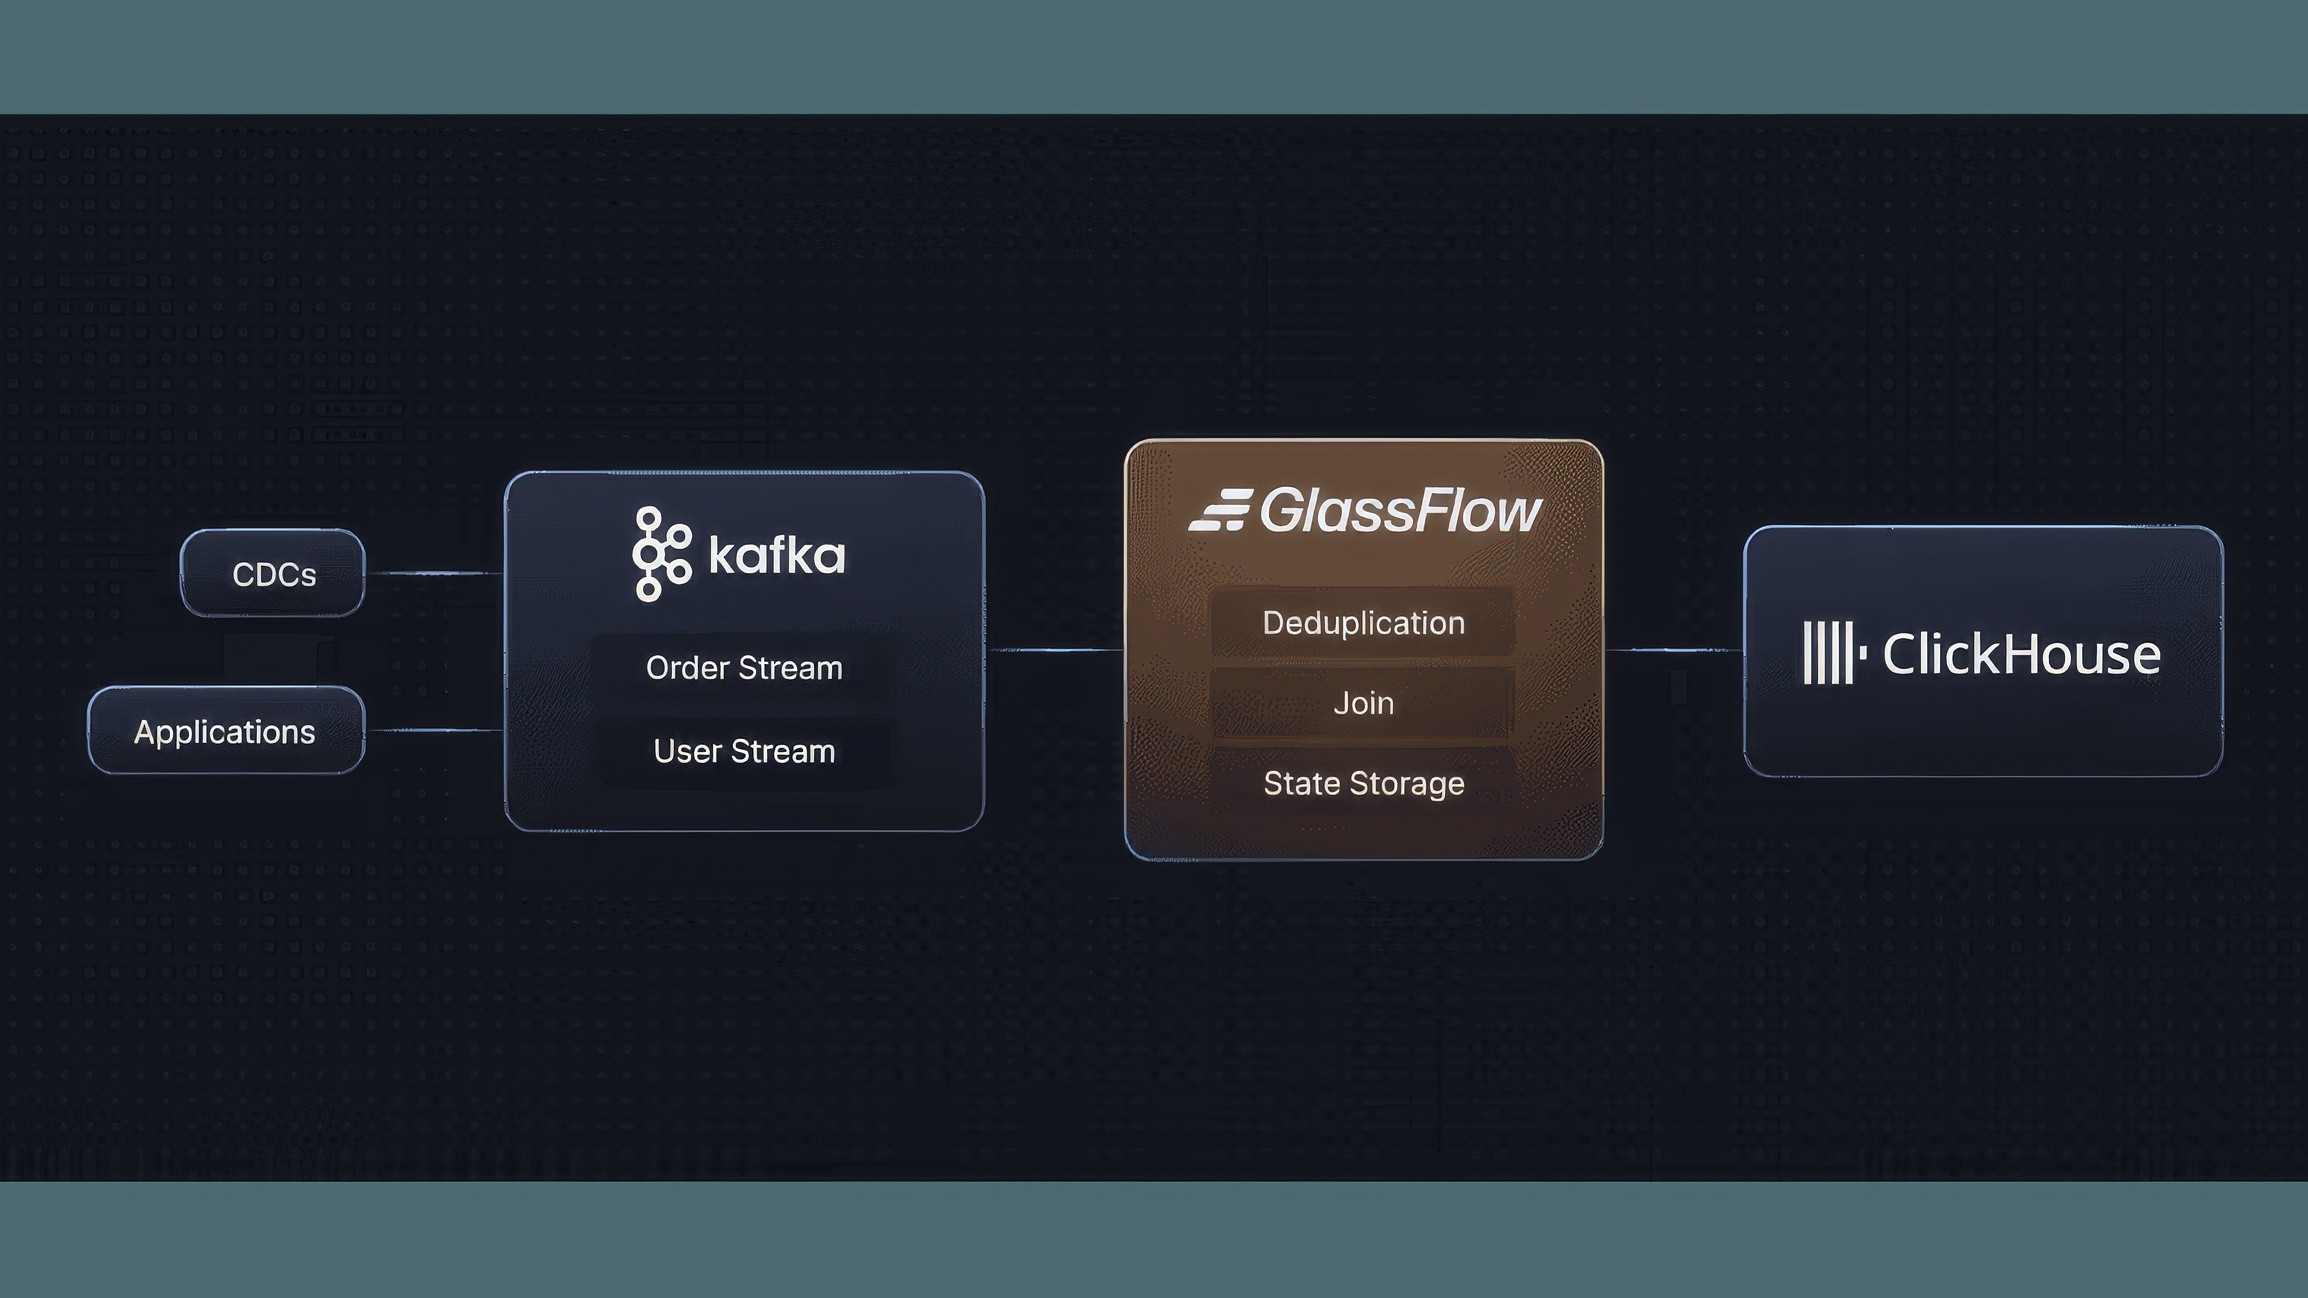
Figure 2. How does Glassflow solve the JOIN challenges for ClickHouse
With Glassflow, stream joins are a breeze: you pick two Kafka topics, choose a join key and time window (up to 7 days), and map the result to ClickHouse with a few clicks. Behind the scenes, Glassflow buffers incoming events, matches them intelligently across streams, and enriches the output—all with exactly-once semantics to guarantee no duplicates or data loss. That means ClickHouse gets clean, joined records, keeping it lean and highly performant.
So, let’s see how to create our very own streaming pipeline for joining two datasets with Glassflow!
2. Experimental Setup
2.1 The Data Streams
In our JOIN experiment, we’ll ingest two separate Kafka topics from Confluent Cloud, generated via Glassgen—Glassflow’s synthetic streaming data generator with a few updates. Each topic represents a distinct stream (for example, orders and user events). We’ll configure Glassgen to emit UUID‑based keys, controlled volume (e.g. 250K records at 50K RPS).
In this experiment, we simulate a simple e‑commerce user ordering scenario using two Kafka topics generated via Glassgen:
Stream Name | Purpose | Schema Fields |
|---|---|---|
| Contains user profile data | event_id, user_id, name, email, created_at |
| Contains order transaction data | order_id, user_id, amount, price, created_at |
We'll configure Glassgen to produce matchable UUIDs across these two streams so that join operations can occur (don’t worry, Glassflow already has a solution for this). The user_profiles stream emits a small set of user data; the orders stream generates orders referencing those same users. This precisely mirrors the join demo in Glassflow’s example configurations.
2.2 Objective of Joining the Data
After joining orders with user_events on user_id, the enriched record schema in ClickHouse will be:
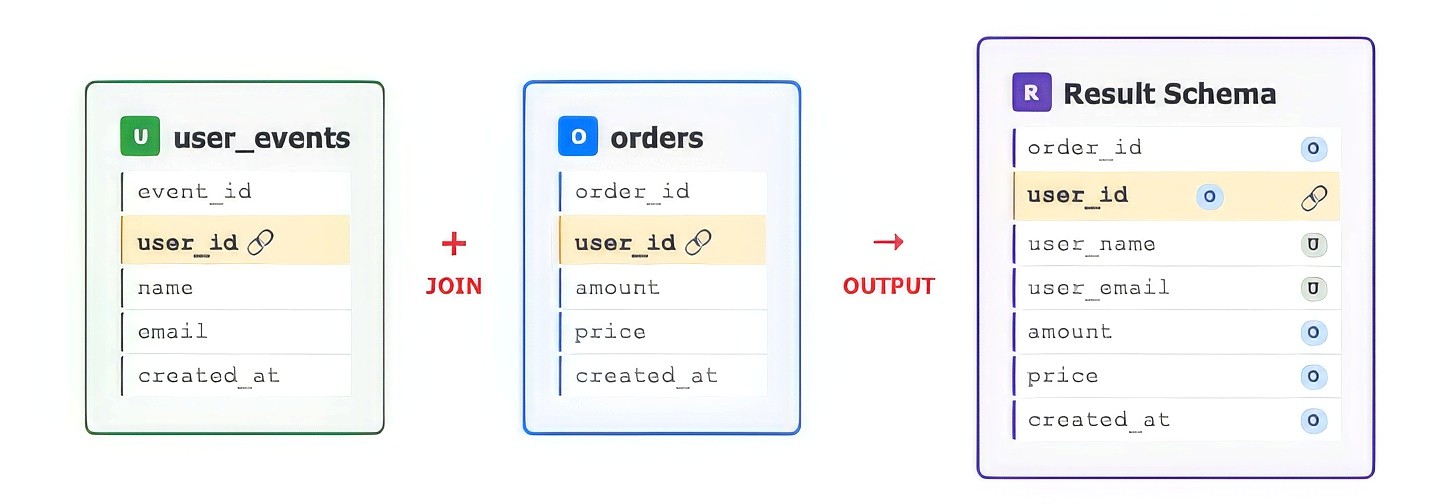
Figure 3. Join results for the user_events and orders stream
Purpose: This temporal enrichment transforms raw order streams into enriched order events that include user metadata—allowing immediate drill‑down into or user‑centric analytics without needing runtime JOINs in ClickHouse. Performing this join upstream keeps ClickHouse queries simpler and faster and avoid unnecessary overloads in the ClickHouse cluster.
2.3 Resource Setup
Here’s the end‑to‑end architecture of the experiment:
Figure 4. End-to-End Pipeline Architecture
2.3.1 Core Components & Deduplication Tutorial
For baseline setup of ClickHouse Cloud, Confluent Cloud Kafka, Glassgen, and Glassflow installation, link back to the already published deduplication tutorial. This covers prerequisites and installation steps for all core components (covered in section 1.2).
Once you have completed the setup, you have to complete two additional configurations:
Creating 2 new topics in Confluent Kafka
Setting up Glassgen configs for the two streams we are planning to JOIN.
2.3.2 Kafka Topics Creation
In your Confluent Cloud (or local Kafka) environment, create two topics:
user_eventsorders
These will serve as the lookup stream and primary stream, respectively. Glassflow’s UI will automatically detect them when configuring the pipeline and the SDK goes a step further and tries to create the topic and only fail if it can’t. You can follow the same steps as shown in this tutorial.
Once you have them created, you should see them listed in the Topics section on Confluent Cloud.
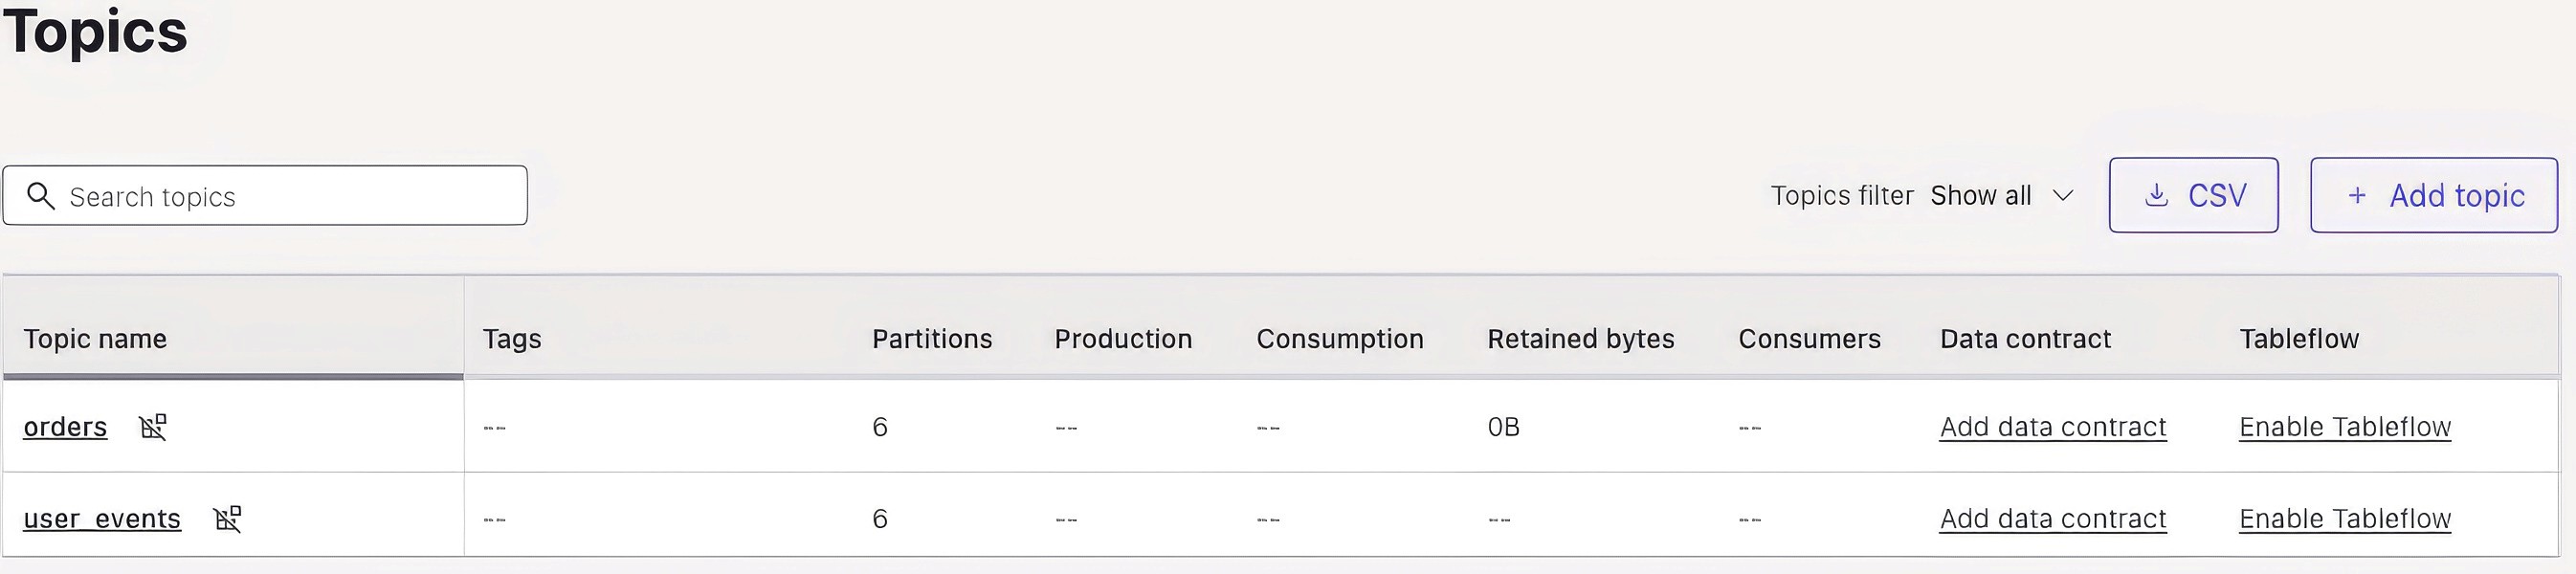
Figure 5. Topics created in Confluent Cloud
2.3.3 Glassgen Configurations for Each Data Stream
This is the really easy part for this tutorial as we already have a script ready that will help you generate all the required data with a single click. Under the hood, it does the following:
Gets the required parameters for the generation part.
Creates predefined list of the joining key, which is user_id in this case.
Use the same list in both user_events and order stream data generation to ensure that we can perform the join operation.
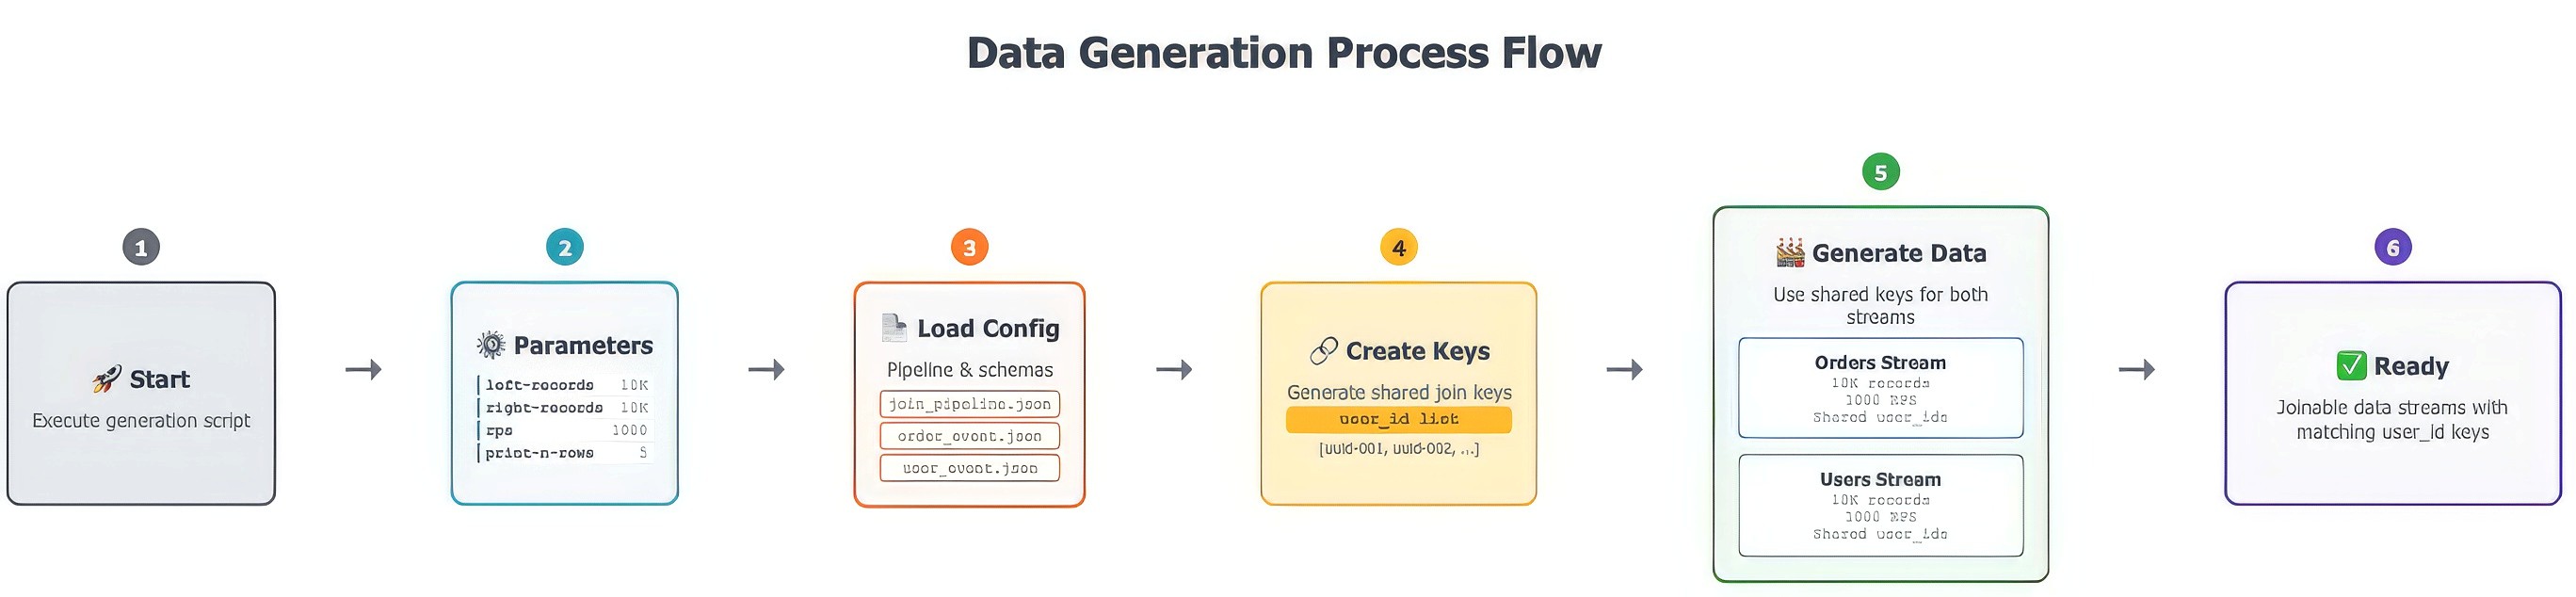
Figure 6. How is the data generated in the Demo Script?
You can refer to the linked script for more details. The great thing about the script is that if you have Glassflow running in the backend, you won’t even have to create a pipeline, the topics and the table, the script does that for you! However, we already created the topics so the script will skip that. Now, let’s start with the pipeline configuration part.
3. Join Pipeline Configuration in Glassflow
We’ve seen how Glassflow handles visual pipelines in the previous deduplication article — but we can achieve the same thing with a simple Python script. So, for this tutorial we will be using the demo_join.py example from the Glassflow repo. Let’s break it down and understand it step-by-step.
3.1 Input Configuration (Data Streams)
The Python demo script uses configuration files (user_event.json, order_event.json that are used to generate events on kafka with Glassgen) and join_pipeline.json (the pipeline config file) to define:
A left (primary) stream: orders
A right (lookup) stream: user_events
Note that both share user_id as the join key, which will be pre-generated so that the same ids can be used for both the data streams. You can run the demo with:
In addition to the above required fields, additional configuration options also let you set:
Option | Description | Default |
|---|---|---|
| Number of records to generate for left events | 10000 |
| Number of records to generate for right events | 10000 |
| Records per second generation rate | 1000 |
| Skip confirmation prompt | False |
| Cleanup ClickHouse table before running | False |
| Number of records to print from ClickHouse | 5 |
We will run the pipeline with the default values for now. Next, let’s move on to the join logic.
3.2 Join Logic
You can find details regarding the joining logic in the Glassflow pipeline JSON. Here is what you will see if you open the one provided by us:
The time window ensures that Glassflow buffers matching data across streams: when an order arrives, it matches any user_event within ±1 hour. Late-arriving events are still correctly joined within that window.
3.3 ClickHouse Configuration
The demo auto-creates and writes to a ClickHouse table, mapping fields like:
Table Column | Source Stream | Source Field |
|---|---|---|
order_id | orders | order.id |
user_id | orders | user.id |
user_name | user_events | user.name |
user_email | user_events | user.email |
amount | orders | order.amount |
price | orders | order.price |
created_at | orders | created_at |
The pipeline config defines the table schema and batching behavior, and Glassflow automatically handles table creation and field mapping.
3.4 Pipeline in Action
To see the pipeline in action, all you have to do is clone the official Glassflow repository, start Glassflow, go into the demos folder and run the demo_join.py file we discussed in detail in the previous sections and that’s it! It will do everything else for you.
However, it is configured to run with local deployments for both Kafka and ClickHouse. We are using Cloud based deployments so we will have to make some changes in the pipeline configuration. Specifically, we have to update the Kafka and ClickHouse credentials with the cloud credentials we would like to use.
So, get the credentials and update the following two configurations in the join_pipeline.json file:
Note: Setting the ClickHouse Sink port to 9440 is very important and good practice as that is the most efficient way to communicate with ClickHouse (TCP connection). You can either do a secure connection through port 9440 or an unsecure connection with port 9000.
Once we run the pipeline using the above mentioned Python command, the flow under the hood will be as follows:
Load Configuration: Reads pipeline settings from the provided JSON file.
Prepare ClickHouse and Kafka: Ensures the target table and topics exists, creating it if necessary.
Initialize Pipeline: Creates the GlassFlow pipeline if it doesn't already exist.
Generate Join Keys: Produces a shared set of UUIDs to be used as join keys in both streams.
Emit Events:
Produces right-stream events (user data) using the join keys.
Produces left-stream events (orders) using the same keys.
Verify Results:
Waits for the sink to flush.
Validates record count in ClickHouse.
Displays sample joined records.
You should see the data in ClickHouse and also see the following output in the terminal where you run the join_demo file.
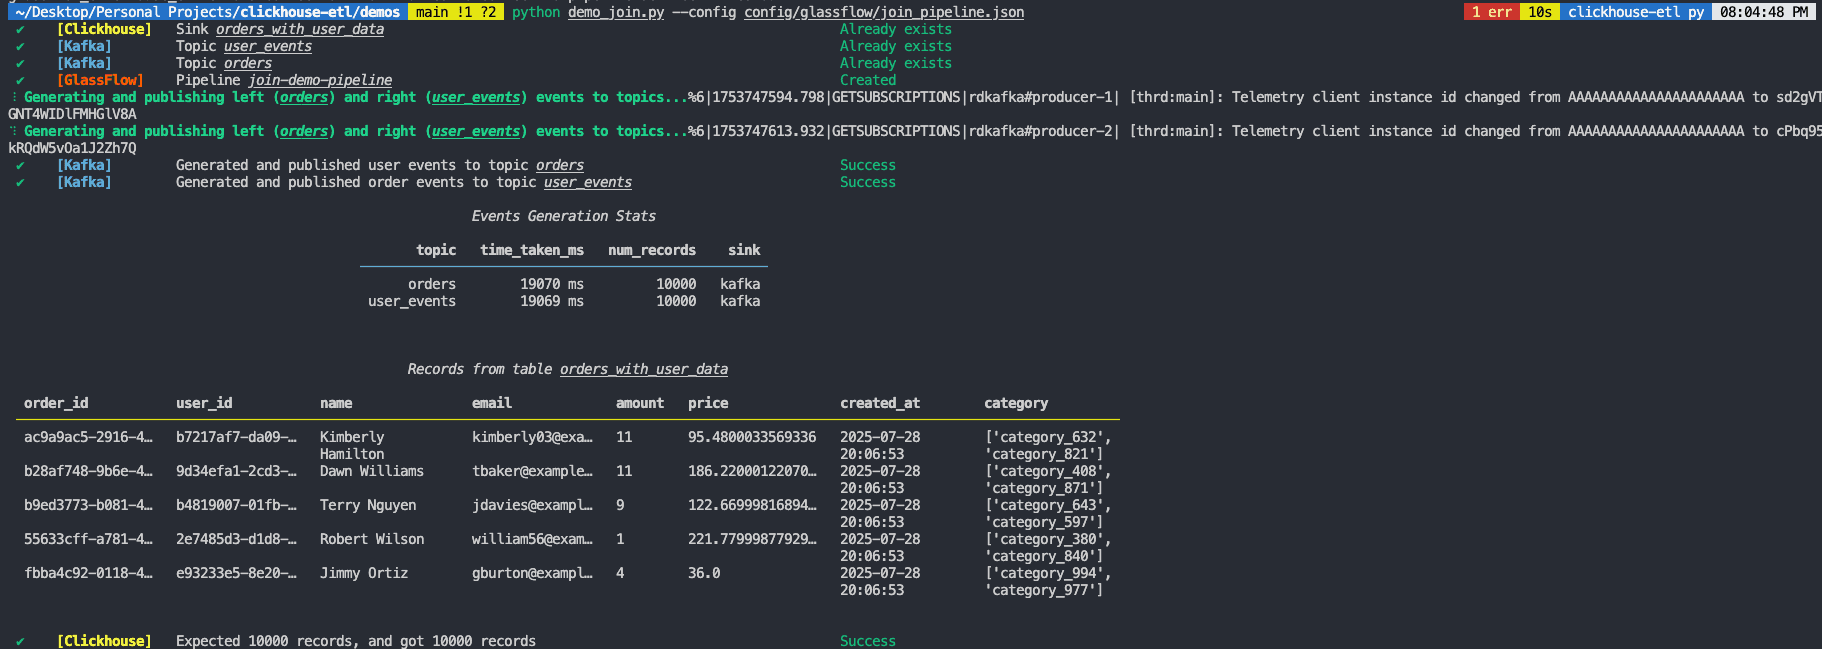
Figure 7. How does the Pipeline Output Look?
4. How GlassFlow Stands Out?
Because the demo_join.py example does everything in one script—including pipeline deployment, data generation, and verification—it’s a great way to show how Glassflow's capabilities work either with no-code via UI—or code via a lightweight Python SDK.
Here is a better picture on how Glassflow stands out:
Feature | ClickHouse + ClickPipes | Apache Flink | Glassflow (visual or via |
|---|---|---|---|
Join support | ❌ None | ✅ Full | ✅ Temporal joins configured via UI or Python script |
Join window | N/A | Configurable | Up to 7 days (demo uses 1 h) |
Setup effort | Manual SQL / CLI | High (YAML, code, job clusters) | Low: UI clicks or run the demo script |
Data quality | ❌ no dedupe/join logic | Must code yourself | ✅ built-in dedup + exactly‑once |
Output delivery | Custom export | Need ClickHouse sink integration | ✅ automatic mapping to ClickHouse table |
5. Conclusion
That’s it — you’ve just built and deployed your first stream join pipeline with Glassflow! From generating synthetic Kafka data using Glassgen to enriching your streams and writing clean, joined records into ClickHouse, you’ve seen how fast and intuitive it is to get started.
What makes Glassflow truly stand out is how it solves the complexities of real-time stream joins—something that traditionally required heavy tools like Flink or tedious SQL hacks. With Glassflow, everything from buffering, deduplication, state handling, and ClickHouse ingestion is taken care of behind the scenes.
And this is just the beginning. Glassflow supports even more powerful pipeline types to suit every stage of your real-time analytics journey:
🔁 Stream Joins – Seamlessly enrich and merge data across streams in real time
🔄 Deduplicate and Join – Build hybrid pipelines with both logic layers handled for you
📥 Simple Ingestion – Push raw, structured data directly to your target stores like ClickHouse, with minimal setup
Whether you prefer a low-code interface or programmatic control via Python, Glassflow makes building streaming pipelines approachable, scalable, and production-ready.
Ready to explore more? Head over to the official documentation and take your streaming architecture to the next level.
Did you like this article? Share it!
You might also like


Data transformations at TB scale for ClickHouse
Get query ready data, lower ClickHouse load, and reliable pipelines at enterprise scale.
