ljn
Tutorials
A demo using GlassFlow to deduplicate and filter Kafka events before they reach ClickHouse for real-time fraud detection.
Written by
Armend Avdijaj
-

Introduction
Modern applications generate a constant stream of login attempts, password resets, payment events, and API calls. Fraud often hides in that stream as a pattern, not as a single row: repeated failed logins from one IP, the same event replayed multiple times, or a high-value account being attacked across several devices in a short period.
That is why real-time fraud detection is a streaming problem. You need an ingestion layer that can absorb events quickly, a processing layer that can clean and shape the stream before it becomes noisy, and an analytics layer that can query recent activity with very low latency.
In this tutorial, we will build a simple fraud detection pipeline with:
Kafka for event ingestion
Glassflow for deduplication and delivery
ClickHouse for fast fraud analytics queries
The tutorial is intentionally simple. We will focus on suspicious login attempts because the pattern is easy to understand and translates well to real systems. The main goal is to show how Glassflow adds value to your fraud detection pipelines: it keeps the stream clean and reliable before the data reaches ClickHouse.
What You Will Build
By the end of this tutorial, you will have:
A local GlassFlow environment running with Kafka and ClickHouse
A Kafka topic named
login-attemptsA ClickHouse table that stores filtered, deduplicated login failures
A GlassFlow pipeline that:
reads from Kafka
removes duplicate events using
event_idwrites clean data into ClickHouse
ClickHouse queries that detect suspicious failed-login activity in
30s,5m, and1hwindows
Supporting files for this article:
scripts/generate_login_events.pyscripts/publish_to_kafka.shglassflow/fraud_detection_pipeline.jsonsql/fraud_detection_queries.sql
1. The Fraud Detection Use Case
1.1 Detecting Suspicious Login Activity
Login fraud is one of the easiest fraud scenarios to explain and one of the most common to implement poorly.
The raw stream usually contains:
successful logins
failed logins
retries caused by clients or upstream services
repeated attempts from the same IP
attempts against the same account from multiple devices
We do not need a complex machine learning model to spot the first layer of suspicious behavior. A few practical signals already help:
4+failed logins from the same IP in30s5+failed logins for the same user and IP in5m8+failed logins or3+unique IPs against the same user in1h
These are simple rules, but they are useful. They help operations teams react quickly, and they create a clean foundation for more advanced risk scoring later.
1.2 Why Real-Time Event Streams Matter
Batch jobs are useful for reporting. Fraud detection is different.
If a login attack is happening right now, finding it thirty minutes later is often too late. In a streaming system, each event can be processed as it arrives:
Kafka absorbs the incoming stream
GlassFlow applies the application logic to the stream before it lands to ClickHouse
ClickHouse makes recent activity queryable almost immediately
This separation is important. Kafka is excellent at transport. ClickHouse is excellent at analytics. GlassFlow is the thin processing layer between them.
2. Pipeline Architecture
2.1 Core Components (Kafka, GlassFlow, ClickHouse)
This tutorial uses three components:
Kafka: Kafka is the input layer. Our application writes login attempt events into the login-attempts topic.
GlassFlow: GlassFlow consumes the topic, applies light stream processing transformations, and sends the results to ClickHouse. In this tutorial, it handles:
deduplicating retried events by
event_idreliably sinking the cleaned stream into ClickHouse
ClickHouse: ClickHouse stores the cleaned events and runs the fraud queries. It is the best place to ask analytical questions, such as "how many failures happened in the last 5 minutes for this account?"
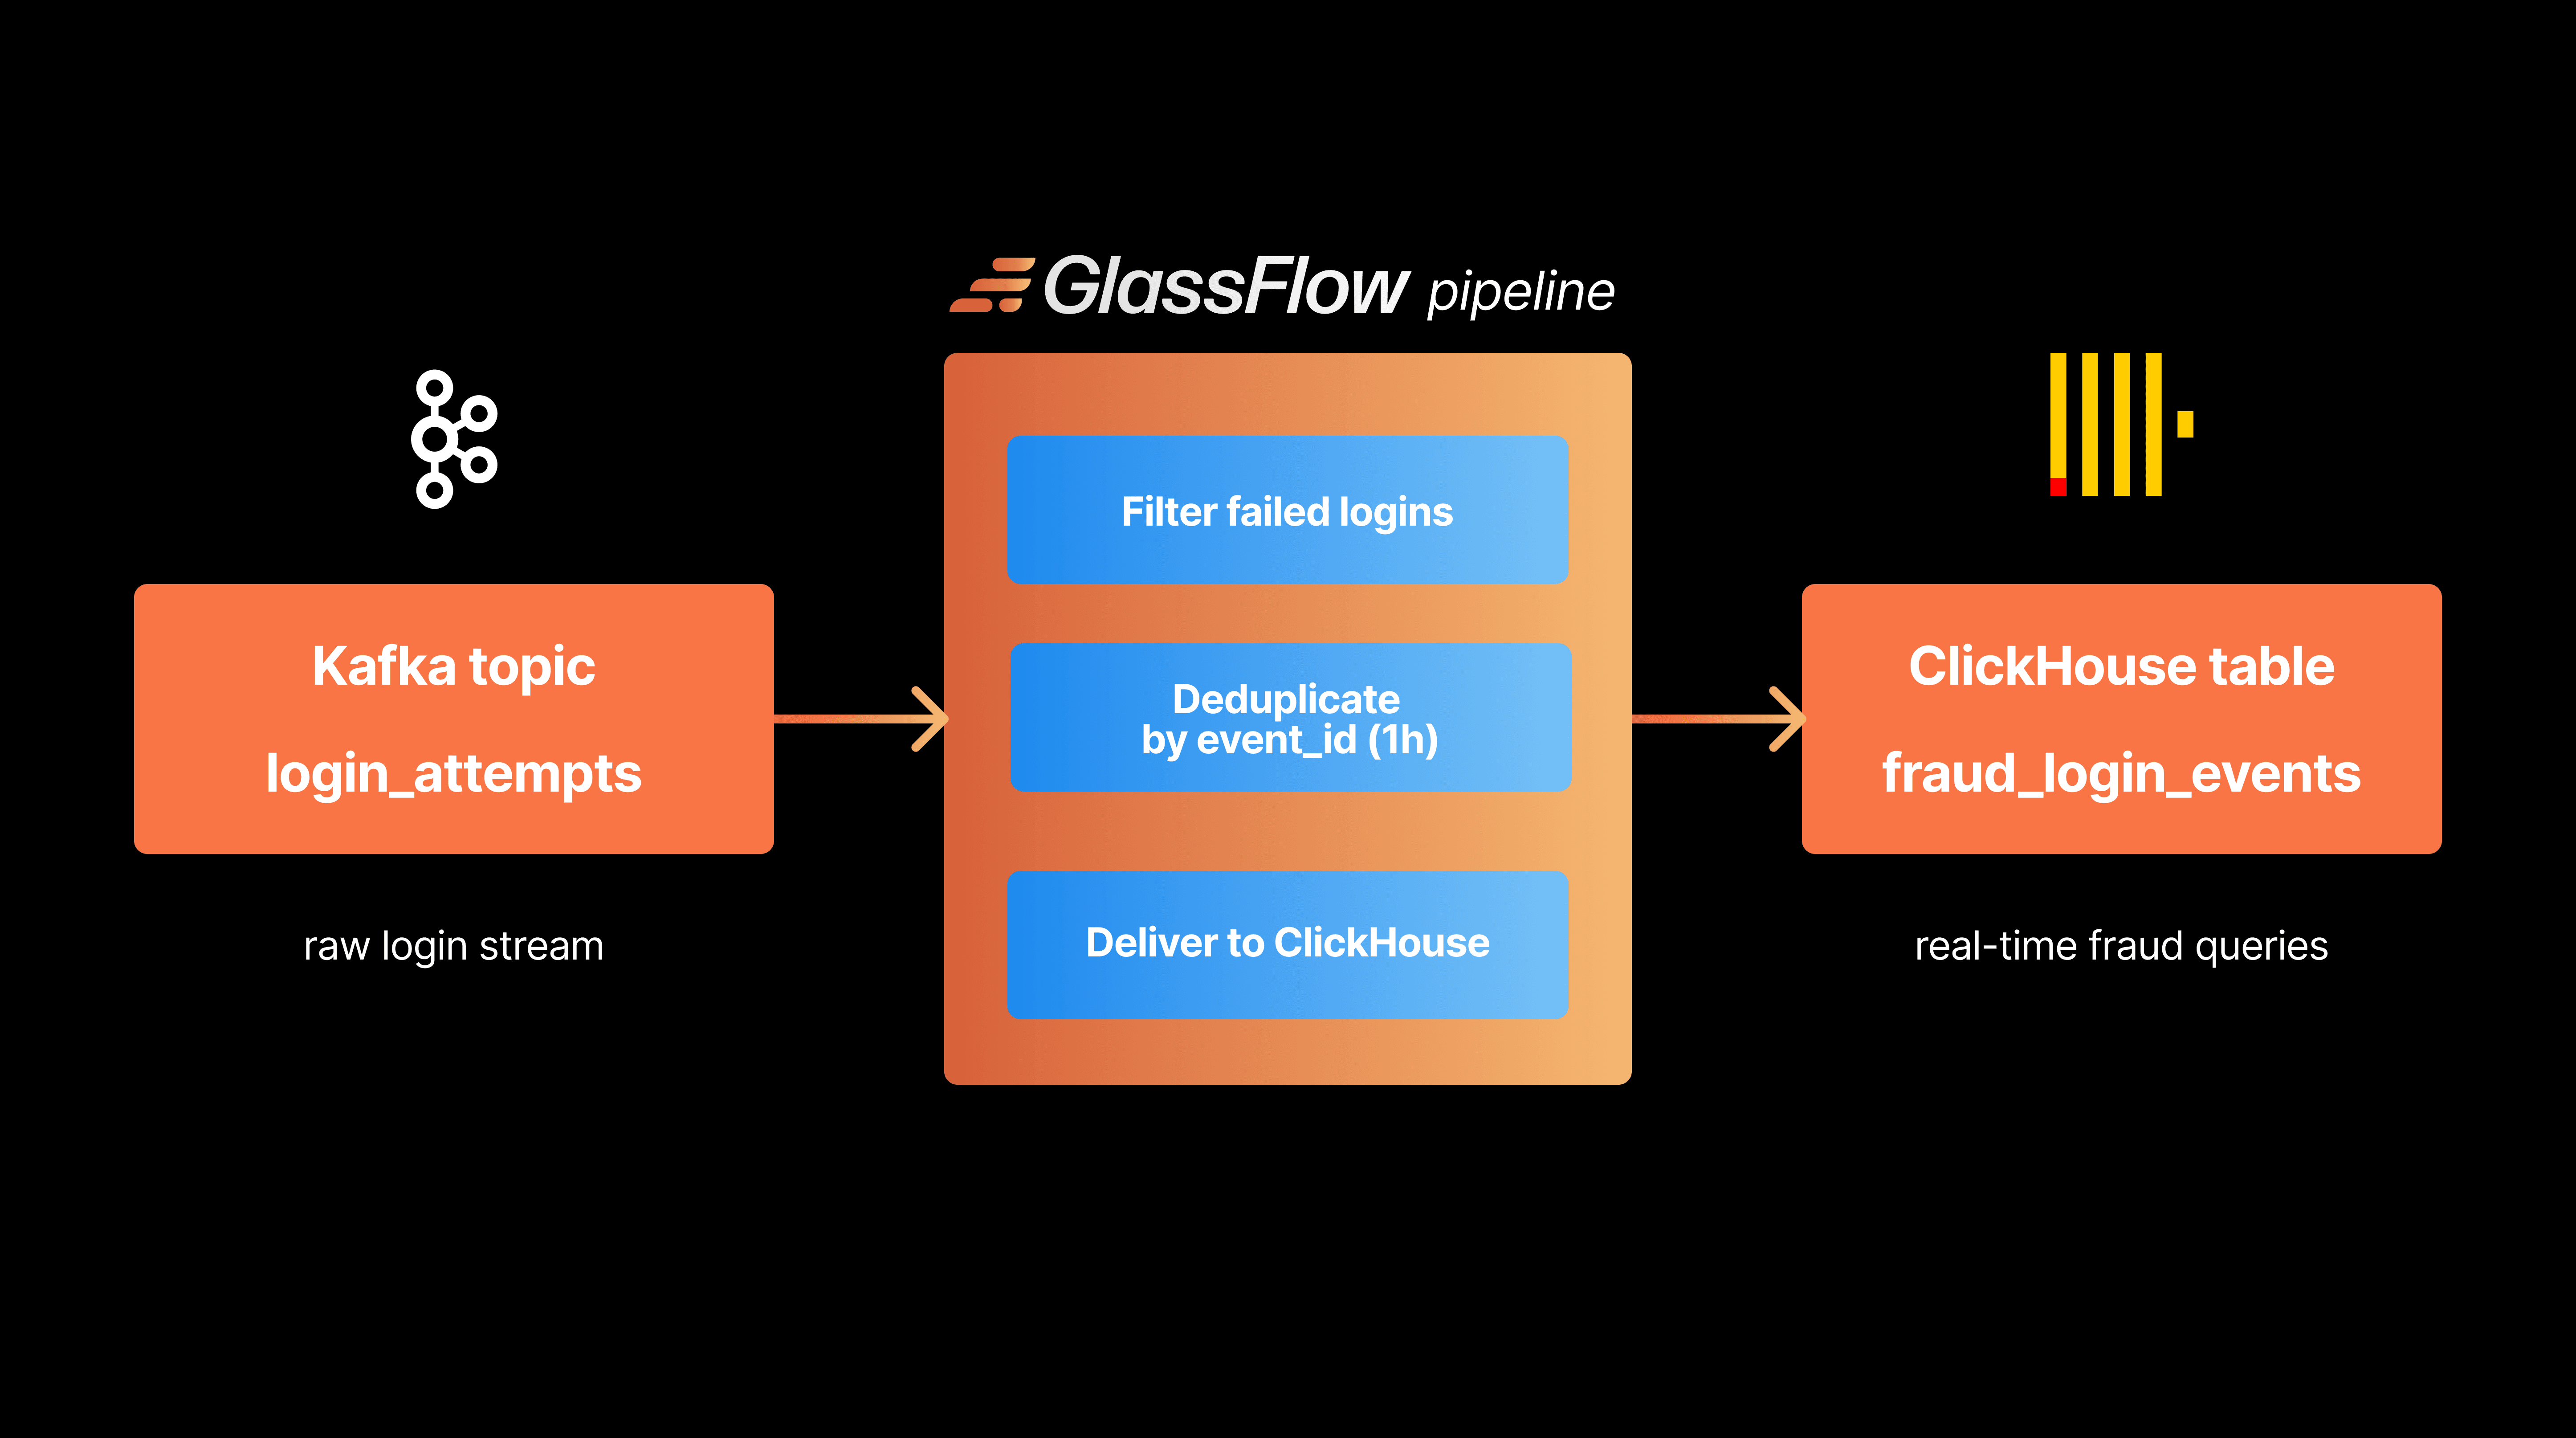
Figure 1. The tutorial architecture uses Kafka for ingestion, GlassFlow for stream cleanup, and ClickHouse for fraud analytics.
2.2 Event Flow Through the System
The event flow is straightforward:
An application publishes login events to a Kafka topic.
GlassFlow reads events from the topic.
GlassFlow removes duplicate events using a
1hdeduplication window.GlassFlow writes the cleaned rows to ClickHouse.
ClickHouse queries identify suspicious failed-login patterns over
30s,5m, and1h.
Using the above event flow, makes the application clean while keeping responsibilities clear between systems:
Kafka as the event transportation layer
GlassFlow as the event preparation and real time processing layer
ClickHouse as the real time online analytical layer
3. Windowing for Fraud Detection
Windowing is the idea of looking at activity over a limited slice of time instead of across the entire table.
3.1 Time-Based Windowing (30s, 5m, 1h)
Different fraud patterns appear at different speeds.
30 seconds - Good for short brute-force bursts. If one IP fails against the same account several times almost instantly, this window catches it.
5 minutes - Good for repeated attack attempts that are not completely explosive, but still active enough to matter.
1 hour - Useful for slower distributed attacks, especially when the same user receives attempts from multiple IPs or devices over time.
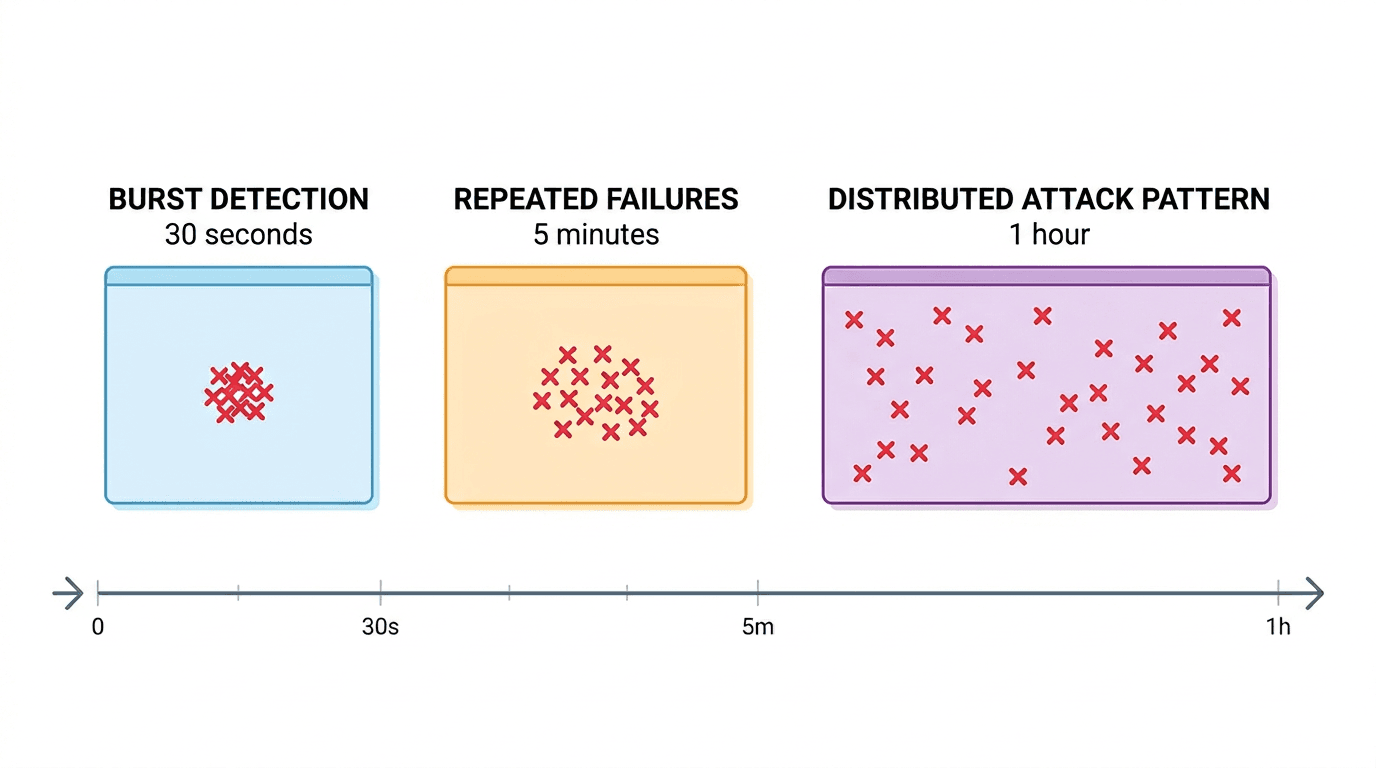
Figure 2. Different detection windows capture different fraud patterns, from short bursts to slower distributed attacks.
3.2 Choosing the Right Window Size
There is no universal window size. Short windows detect aggressive attacks faster, but they can miss slower behavior. Long windows catch more patterns, but they also combine more unrelated activity.
A practical approach typically uses:
short time windows for alerting
medium time windows for account-level investigation
longer time windows for analyst review and correlation
In this tutorial, ClickHouse handles the analytical windows while GlassFlow uses its own time window for deduplication. That keeps the pipeline simple and accurate.
3.3 Stateful Transformations in Windows (Deduplication, Joins, Aggregations)
There are three common stateful operations in streaming pipelines:
Deduplication: If the same event is retried by an application or replayed by an upstream connector, deduplication prevents inflated fraud counts.
Joins: You can enrich login events with user profile or device metadata from another Kafka topic before writing to ClickHouse.
Aggregations: This tutorial performs aggregations in ClickHouse because it is the most natural place to compute fraud windows and thresholds. That split matters. GlassFlow keeps the stream trustworthy. ClickHouse turns the cleaned stream into fraud signals.
4. Where GlassFlow Fits
GlassFlow is the part that makes the Kafka-to-ClickHouse path practical.
4.1 Consuming Events from Kafka
GlassFlow connects directly to Kafka and continuously reads from the login-attempts topic. That means we do not need to build a custom consumer service just to move JSON from Kafka into ClickHouse.
4.2 Filtering Suspicious Events
Most login events are not useful for downstream fraud detection. In Glassflow, filter expressions define what to drop, not what to keep. So if we want to keep only failed logins, we need to drop everything else:
This small filter has a big effect:
less data stored in ClickHouse
simpler fraud queries
lower noise in dashboards and alerts
To keep only failed logins in the pipeline output, use status != 'failed' as the filter expression.
4.3 Applying Windowing
In this tutorial, GlassFlow uses a 1h deduplication window on event_id.
Why does that matter? Because duplicated login events are common in distributed systems. Retries, connector restarts, and accidental replays can all make fraud counts look worse than they really are. With a deduplication window, GlassFlow keeps only the first copy of each event inside that period.
4.4 Event Enrichment
GlassFlow can also enrich events before they reach ClickHouse. For example, you could:
join logins with a user-risk stream
add device metadata from another Kafka topic
normalize or reshape fields with stateless transformations
We are not using enrichment in the main walkthrough because the goal is to keep the tutorial short and easy to reproduce. But it is worth knowing that GlassFlow can grow with the pipeline.
4.5 Safe Delivery into ClickHouse
Once the stream is cleaned and deduplicated, GlassFlow writes it into ClickHouse. This is the key operational advantage of the setup:
you avoid writing and maintaining a custom sink service
you reduce duplicate rows before they hit storage
you keep ClickHouse focused on analytics, not stream cleanup
That is the main benefit of GlassFlow in this architecture. It is not trying to replace Kafka or ClickHouse. It makes them work together with less glue code.
5. Building the Fraud Detection Pipeline
5.1 Creating the Kafka Event Stream
GlassFlow provides a CLI for local testing. According to the GlassFlow documentation, glassflow up starts a local environment with:
a Kind cluster
Kafka
ClickHouse
the GlassFlow UI and API
Install the CLI using the GlassFlow installation docs. The Homebrew path is:
If Homebrew gives you trouble on macOS, you can also download the prebuilt binary from the GlassFlow CLI GitHub releases page.
Start the local environment:
Once the environment is ready, the default local endpoints are:
GlassFlow UI:
http://localhost:30080GlassFlow API:
http://localhost:30180ClickHouse HTTP:
http://localhost:30090
The startup looks like this:
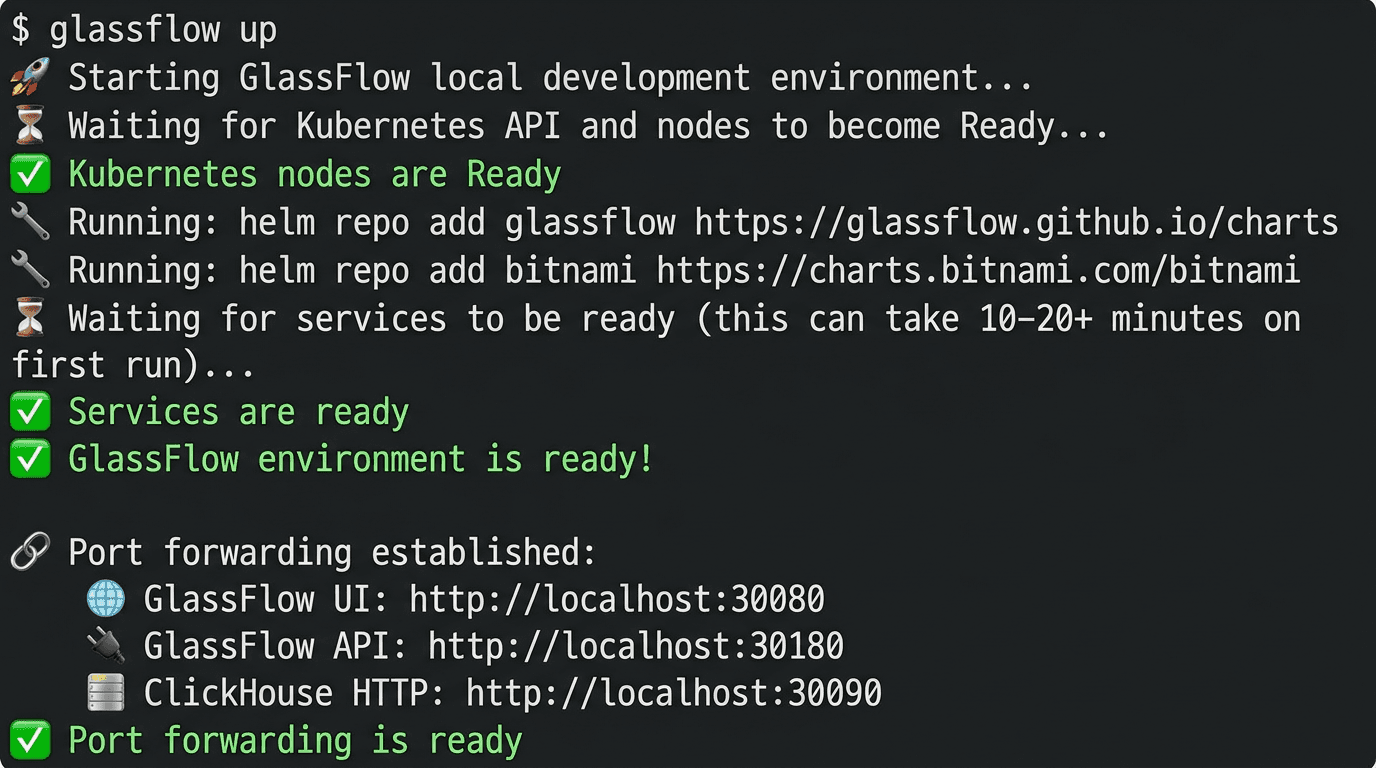
Figure 3. A successful
glassflow uprun starts the local Kind cluster and exposes the GlassFlow UI, API, and ClickHouse endpoints.
Now create the Kafka topic that will hold login attempts:
Generate a realistic event stream with the helper script:
The file includes:
21successful logins19unique failed logins6duplicate retries that reuse existingevent_idvalues
Two sample rows from the generated events look like this:
5.2 Configuring the GlassFlow Pipeline
For this tutorial, we configure Glassflow programmatically with glassflow/fraud_detection_pipeline.json.
This pipeline:
reads from
login-attemptsstarts from
earliestso the demo is reproducibledrops non-failed logins with
status != 'failed'deduplicates on
event_idwith a1hwindowwrites filtered, deduplicated failures to ClickHouse
Create a Python virtual environment and install the SDK:
Create the pipeline from the checked-in JSON file:
Glassflow filters are drop conditions. In this walkthrough, status != 'failed' removes non-failed rows and keeps only failed logins flowing to ClickHouse.
If you want to use the UI instead, use these values:
Troubleshooting Note
In this run, the pipeline pods needed a one-replica workaround because they expected a GLASSFLOW_POD_INDEX label that was not present on the generated StatefulSets. If your pods fail with that exact error, patch the template label and restart the pod. The pattern looks like this
5.3 Storing Events in ClickHouse
The destination table is included in sql/fraud_detection_queries.sql. Create it with:
Now publish the generated file into Kafka:
Because the tested pipeline reads from earliest, it is also fine if you create the pipeline after producing the sample file. In our successful local run, GlassFlow wrote:
19total unique login events to ClickHouse19unique failed logins0successful logins
That is the key GlassFlow effect in this tutorial: non-failed events were dropped and duplicate retries were removed before ClickHouse analytics started.
5.4 Querying Suspicious Activity
Once the data is in ClickHouse, run the fraud queries from sql/fraud_detection_queries.sql. Because GlassFlow now keeps only failed logins in the destination table, the queries can focus directly on fraud thresholds.
The main 5m query is:
Run it:
In the tested run, the result was:
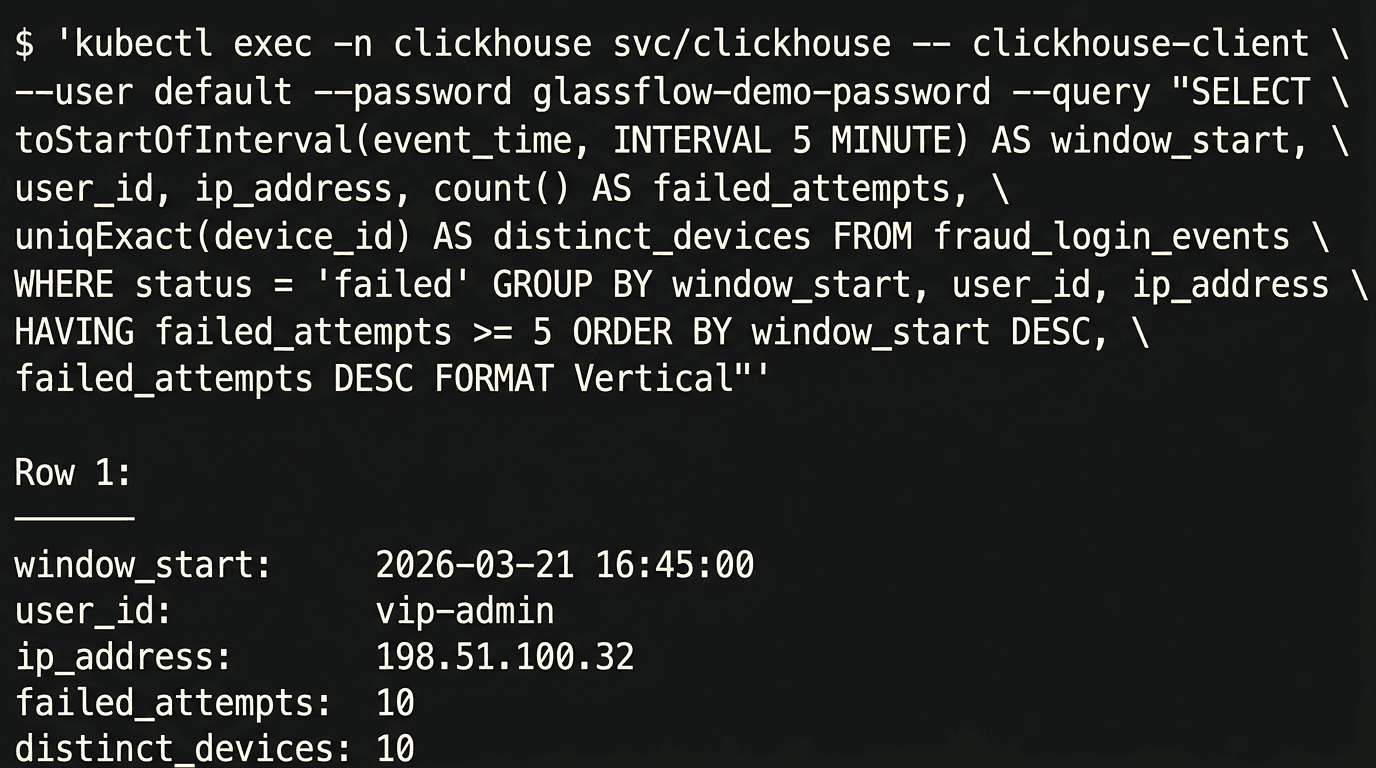
Figure 4. The final ClickHouse query highlights the suspicious `vip-admin` burst after GlassFlow removes duplicate retries.
The signal is exactly what we wanted:
vip-adminstands out in the5mwindowthe source IP is
198.51.100.32the burst contains
10failed attempts across10devices
Most importantly, the duplicate retries in the original Kafka stream did not inflate this number, and non-failed events never reached the destination table. GlassFlow handled both cleanup steps before the data landed in ClickHouse.
Why This Tutorial Works
This pipeline is intentionally modest, but it demonstrates the exact value of GlassFlow:
Kafka remains the source of truth for the event stream
GlassFlow removes noisy or duplicate rows before storage
ClickHouse stays focused on low-latency analytics and fraud windows
That design is effective because every component does one job well.
Without GlassFlow, you would usually end up writing custom code for:
Kafka consumption
deduplication state management
delivery into ClickHouse
With GlassFlow, those steps become configuration instead of application code.
Cleanup
When you are done with the demo, shut down the local GlassFlow environment with:
If you need to force cleanup of the local Kind cluster and related resources, use:
Conclusion
Fraud detection gets complicated very quickly, but the first version of the pipeline does not need to be complicated.
For suspicious login activity, a practical architecture is:
Kafka to collect the stream
GlassFlow to deduplicate and deliver it
ClickHouse to analyze it in real time
This combination works especially well because it keeps the streaming layer simple while still giving you fast, trustworthy analytics. In this tutorial, GlassFlow was the difference between storing raw noisy events and storing a stream that was immediately useful for detection.
From here, you can extend the pipeline with:
GlassFlow joins to enrich logins with user metadata
stateless transformations for device or user-agent parsing
more advanced ClickHouse risk scoring and alerting
If you want to build Kafka-to-ClickHouse pipelines without writing and maintaining custom stream-processing glue code, try GlassFlow and see how quickly you can get a real-time pipeline up and running.
The full companion code for this tutorial is available in GlassFlow's GitHub demo space.
Helpful Links and References
Did you like this article? Share it!
You might also like


Data transformations at TB scale for ClickHouse
Get query ready data, lower ClickHouse load, and reliable pipelines at enterprise scale.
